Configuring Universal Capture Additional Settings
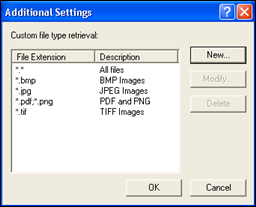
By default, Universal Capture can retrieve the following file types: .bmp, .jpg, .tif. If your session uses Universal Capture, you can add custom file types, or lists of custom file types, to this selection. Once added, the custom file type lists will appear in the File Type drop-down list on the Universal Capture toolbar.
To add a custom file type list
- Use one of the following methods to open the
 Additional Settings dialog box.

- Click New.
- In the
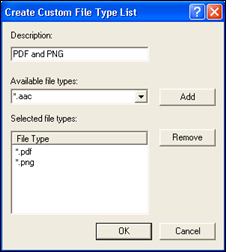
 Create Custom File Type List dialog box, under Description, provide a brief description of the file type. A description is required.

- Under Available file types, select a file type from the drop-down list or manually enter one.
Note: Ensure the file type conforms to following syntax: *.filetype. For example, *.avi or *.doc.
- Click Add.
- Continue to add file types as you see fit. Adding more than one file type in this dialog box broadens the file retrieval scope.
Example: Mario creates the following file type list: *.html;*.htm;*.css. Mario performs Universal Capture once on a directory that contains three .html files, one .htm file, and four .css files. In this scenario, eight files will be captured. Note that semicolons (;) are used to separate file types.
- Click OK to close the Modify Custom File Type List dialog box.
- Click OK to close the Additional Settings dialog box.
- The custom file type list you created is now available from the File Type drop-down on the Universal Capture toolbar.
 Additional Settings dialog box.
 button on the Universal Capture toolbar.
 Create Custom File Type List dialog box, under Description, provide a brief description of the file type. A description is required.
